Positioning an Imported Model
 Zero Plane Position In Model
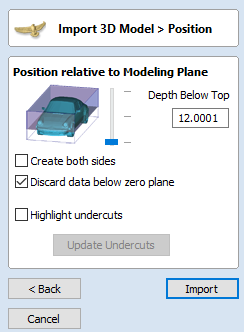
This slider bar determines where the 3D model will be cut-off when converting to a Component. You can move this up and down with the mouse or use the Middle or Bottom buttons to locate the plane in the correct position.
Note
Anything in the original model which is an undercut (goes underneath another part of the 3D model) will be discarded and a vertical wall will be created down to the plane from the silhouette (looking down Z axis) edge of the model.
Create both sides
If you are working in a 2 sided setup you can check ✓ this option and two components will be created - one looking down the Z axis from above to the zero plane and one looking up from below. Each side of the model will go onto a side. This will provide you with the geometry that can be edited to cut the original imported 3D part as a 2-sided job.
If you were importing a model that contains a non-convex surface for instance a bowl you can import the entire model on each side by sliding the slicing plane all the way to the bottom.
Discard data below zero plane
Checking ✓ this will remove any data below the original Zero level within the imported 3D model. If the model is effectively a negative model such as a dished or recessed design with a flat plane then you should uncheck this option to make sure you retain the 3D data below the plane.
Highlight Undercuts
Checking ✓ this will help highlight any part of the 3D model which will lose detail when being imported by turning those parts of the 3D model Dark Purple in the 3D View.
As undercuts cannot be supported, any part of the model under this will be obscured and essencially lost once imported.
This tool will also highlight all parts of the model in Dark Purple which have Normal Issues in the original file. If you have large areas of the top surface of your 3D model highlighted like this and you do not get the import result you are expecting with your 3D model, you may need to investigate the original 3D model file in the original software used to create it to ensure it is solid and whole, and does not have parts of itself "inside out".
Back, Cancel and Import
The final options are:
- will return you to the Import 3D Model > Transform form.
- will close the Import form and not import your model.
- with complete the process and convert your 3D model into a 3D Component within Aspire